Rails + PostgreSQL + Docker + Renderの構成で環境構築をしたところ、Rails7.1からリリースされた新機能によって詰まったため、備忘録としてまとめます。
1. ファイルの準備
まずは以下の6ファイルを準備します。
- Dockerfile
- Dockerfile.dev
- compose.yaml
- Gemfile
- Gemfile.lock
- entrypoint.sh
Dockerfile
Dockerfileは公式サンプルをそのままコピペしてRubyのバージョンを変えただけです。
バージョンは現時点で最新安定版の3.2.2を指定しています。
# syntax=docker/dockerfile:1
FROM ruby:3.2.2
RUN apt-get update -qq && apt-get install -y nodejs postgresql-client
WORKDIR /sample-app
COPY Gemfile /sample-app/Gemfile
COPY Gemfile.lock /sample-app/Gemfile.lock
RUN bundle install

# Add a script to be executed every time the container starts.
COPY entrypoint.sh /usr/bin/
RUN chmod +x /usr/bin/entrypoint.sh
ENTRYPOINT ["entrypoint.sh"]
EXPOSE 3000

# Configure the main process to run when running the image
CMD ["rails", "server", "-b", "0.0.0.0"]
Dockerfile.dev
Dockerfileと全く同じものをDockerfile.devとして別途作成しておきます。
これはrails newコマンドの実行によりDockerfileがproduction環境用に書き変わってしまうためです。
詳しくは後述します。
# syntax=docker/dockerfile:1
FROM ruby:3.2.2
RUN apt-get update -qq && apt-get install -y nodejs postgresql-client
WORKDIR /sample-app
COPY Gemfile /sample-app/Gemfile
COPY Gemfile.lock /sample-app/Gemfile.lock
RUN bundle install

# Add a script to be executed every time the container starts.
COPY entrypoint.sh /usr/bin/
RUN chmod +x /usr/bin/entrypoint.sh
ENTRYPOINT ["entrypoint.sh"]
EXPOSE 3000

# Configure the main process to run when running the image
CMD ["rails", "server", "-b", "0.0.0.0"]
compose.yaml
今までぼくはファイル名をdocker-compose.yamlとしていましたが、Dockerの公式ドキュメントではcompose.yamlというファイル名が推奨されているため、それに倣います。
services:
  db:
    image: postgres
    volumes:
      - db-data:/var/lib/postgresql/data
    environment:
      POSTGRES_PASSWORD: password
  web:
    build: .
    command: bash -c "rm -f tmp/pids/server.pid && bundle exec rails s -p 3000 -b '0.0.0.0'"
    volumes:
      - .:/sample-app
    ports:
      - "3000:3000"
    depends_on:
      - db
volumes:
  db-data:
Gemfile
Railsのバージョンは現時点での最新安定版の7.1.2を指定します。
source 'https://rubygems.org'
gem 'rails', '7.1.2'
Gemfile.lock
Gemfile.lockは空のままでOKです。
# 空ファイルを用意entrypoint.sh
entrypoint.shも公式サンプルをそのままコピペしてきただけです。
#!/bin/bash
set -e

# Remove a potentially pre-existing server.pid for Rails.
rm -f /sample-app/tmp/pids/server.pid

# Then exec the container's main process (what's set as CMD in the Dockerfile).
exec "$@"
2. Rails newコマンドの実行
ファイルを作成したらrails newコマンドを実行してRailsアプリケーションの雛形を作成します。
$ docker compose run --rm --no-deps web rails new . --force --database=postgresql --api各オプションの意味は次のとおりです。
- –no-deps:
リンクされたコンテナを起動させない - –force:
Gemfileの上書きを行う - –database=postgresql:
DBとしてPostgreSQLを指定 - –api:
APIモードでRailsを使う
3. 開発環境用と本番環境用のファイルを作る
Rails7.1のリリースノートにあるように、rails newをするとDockerfileはproduction用の内容に上書きされてしまいます!
# syntax = docker/dockerfile:1

# Make sure RUBY_VERSION matches the Ruby version in .ruby-version and Gemfile
ARG RUBY_VERSION=3.2.2
FROM registry.docker.com/library/ruby:$RUBY_VERSION-slim as base

# Rails app lives here
WORKDIR /rails

# Set production environment
ENV RAILS_ENV="production" \
    BUNDLE_DEPLOYMENT="1" \
    BUNDLE_PATH="/usr/local/bundle" \
    BUNDLE_WITHOUT="development"


# Throw-away build stage to reduce size of final image
FROM base as build

# Install packages needed to build gems
RUN apt-get update -qq && \
    apt-get install --no-install-recommends -y build-essential git libpq-dev libvips pkg-config

# Install application gems
COPY Gemfile Gemfile.lock ./
RUN bundle install && \
    rm -rf ~/.bundle/ "${BUNDLE_PATH}"/ruby/*/cache "${BUNDLE_PATH}"/ruby/*/bundler/gems/*/.git && \
    bundle exec bootsnap precompile --gemfile

# Copy application code
COPY . .

# Precompile bootsnap code for faster boot times
RUN bundle exec bootsnap precompile app/ lib/


# Final stage for app image
FROM base

# Install packages needed for deployment
RUN apt-get update -qq && \
    apt-get install --no-install-recommends -y curl libvips postgresql-client && \
    rm -rf /var/lib/apt/lists /var/cache/apt/archives

# Copy built artifacts: gems, application
COPY --from=build /usr/local/bundle /usr/local/bundle
COPY --from=build /rails /rails

# Run and own only the runtime files as a non-root user for security
RUN useradd rails --create-home --shell /bin/bash && \
    chown -R rails:rails db log storage tmp
USER rails:rails

# Entrypoint prepares the database.
ENTRYPOINT ["/rails/bin/docker-entrypoint"]

# Start the server by default, this can be overwritten at runtime
EXPOSE 3000
CMD ["./bin/rails", "server"]
なのでこのDockerfileは開発環境には使えない、、でもせっかく上書きされたならproduction用のDockerfileもこれはこれで使いたい、、
というわけでDockerfileを開発環境用とproduction用に2つ作ります。
3.1 Dockerfileを開発環境・productionに分ける
最初にDockerfileと全く同じDockerfile.devを作成してあるのでこれを開発環境用に、そしてrails newで上書きされたDockerfileはproduction環境用となるため名称をDockerfile.prodに変更します。
3.2 compose.yamlを開発環境・productionに分ける
合わせてcompose.yamlファイルも開発環境・production用の2つを作成する必要があります。
まずcompose.yamlのファイル名をcompose-dev.yamlに変更し、Dockerfile.devをビルドに使用するよう修正します。
services:
  db:
    image: postgres
    volumes:
      - db-data:/var/lib/postgresql/data
    environment:
      POSTGRES_PASSWORD: password
  web:
    build:
      # 開発環境用に追記
      context: .
      dockerfile: Dockerfile.dev
    command: bash -c "rm -f tmp/pids/server.pid && bundle exec rails s -p 3000 -b '0.0.0.0'"
    volumes:
      - .:/sample-app
    ports:
      - "3000:3000"
    depends_on:
      - db
volumes:
db-data:続いてproduction用にcompose-prod.yamlを作成し、こちらのビルドにはDockerfile.prodを使わせます。
services:
  db:
    image: postgres
    volumes:
      - db-data:/var/lib/postgresql/data
    environment:
      POSTGRES_PASSWORD: password
  web:
    build:
      # production環境用に追記
      context: .
      dockerfile: Dockerfile.prod
    command: bash -c "rm -f tmp/pids/server.pid && bundle exec rails s -p 3000 -b '0.0.0.0'"
    volumes:
      - .:/sample-app
    ports:
      - "3000:3000"
    depends_on:
      - db
volumes:
  db-data:
4. buildコマンドの実行
開発環境用とプロダクション用にファイルを分けたらbuildコマンドを実行します。
$ docker compose -f compose-dev.yaml build※捕捉
Gemfileでバージョンを指定しなかった場合、ここで以下のエラーが出ました。
#0 0.288 Bundler 2.4.10 is running, but your lockfile was generated with 2.3.26. Installing Bundler 2.3.26 and restarting using that version.
#0 6.233 Fetching gem metadata from https://rubygems.org/.
#0 6.267 Fetching bundler 2.3.26
#0 6.463 Installing bundler 2.3.26
#0 6.677 Your Ruby version is 3.2.2, but your Gemfile specified 3.1.4Gemfileを見るとなぜかGemfileのバージョンが3.1.4になっていたので3.2.2に修正して再度buildコマンドを実行したら突破できました。
5. database.ymlの修正
ビルドが完了したらconfig/database.ymlにdbコンテナとの接続情報を追記してください。
default: &default
  adapter: postgresql
  encoding: unicode
  # 以下の3行を追加
  host: db
  username: postgres
  password: password
  # For details on connection pooling, see Rails configuration guide
  # https://guides.rubyonrails.org/configuring.html#database-pooling
  pool: <%= ENV.fetch("RAILS_MAX_THREADS") { 5 } %>
6. DB作成コマンドを実行
config/database.ymlへの追記が完了したらDB作成コマンドを実行しましょう。
$ docker compose -f compose-dev.yaml run --rm web rake db:create
[+] Running 1/1
 ✔ Container sample-app-db-1  Created                                                                                                                                       0.1s
[+] Running 1/1
 ✔ Container sample-app-db-1  Started                                                                                                                                       0.4s
Created database 'sample_app_development'
Created database 'sample_app_test'
7. コンテナを起動
DBの作成が確認できたらコンテナを起動してください。
$ docker compose -f compose-dev.yaml up
web-1  | => Booting Puma
web-1  | => Rails 7.1.2 application starting in development
web-1  | => Run `bin/rails server --help` for more startup options
web-1  | Puma starting in single mode...
web-1  | * Puma version: 6.4.0 (ruby 3.2.2-p53) ("The Eagle of Durango")
web-1  | *  Min threads: 5
web-1  | *  Max threads: 5
web-1  | *  Environment: development
web-1  | *          PID: 1
web-1  | * Listening on http://0.0.0.0:3000
web-1  | Use Ctrl-C to stop
8. http://0.0.0.0:3000 にアクセスすると…
以下の画面が表示されていれば無事成功です!
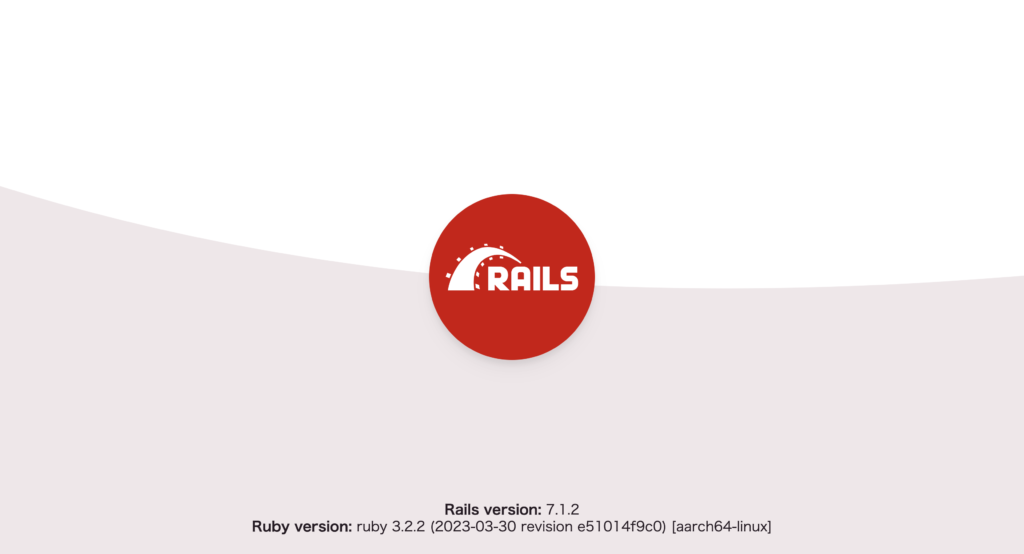
この時点でローカルファイルをいったんGitHubにpushしておきましょう。
9. Renderアカウントの作成
続いてデプロイの設定に入ります。
まずはこちらからRenderのアカウントを作成してください。
10. データベースの作成
アカウントの作成が完了したら右上の「New +」を押してPostgreSQLを選択してください。
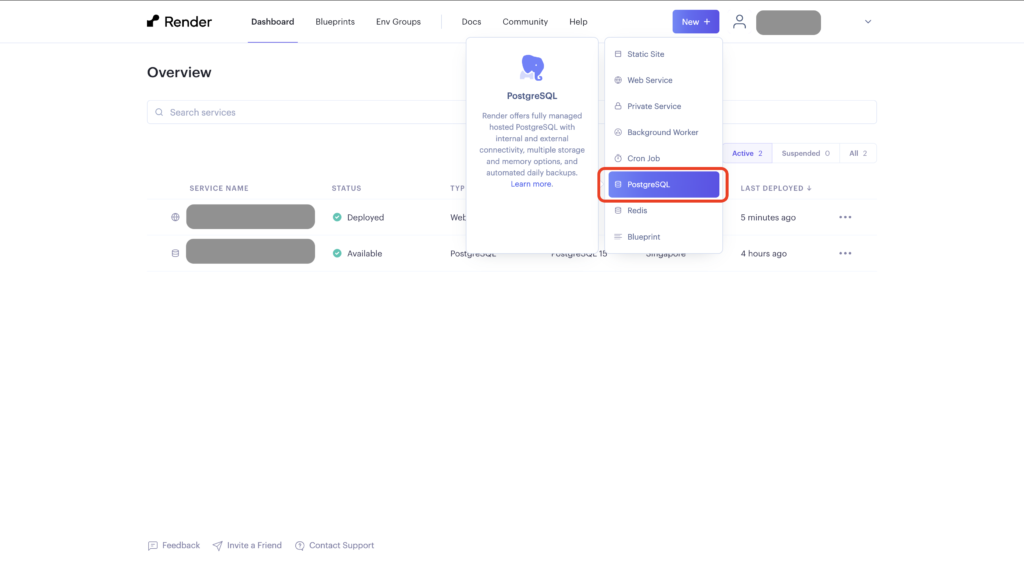
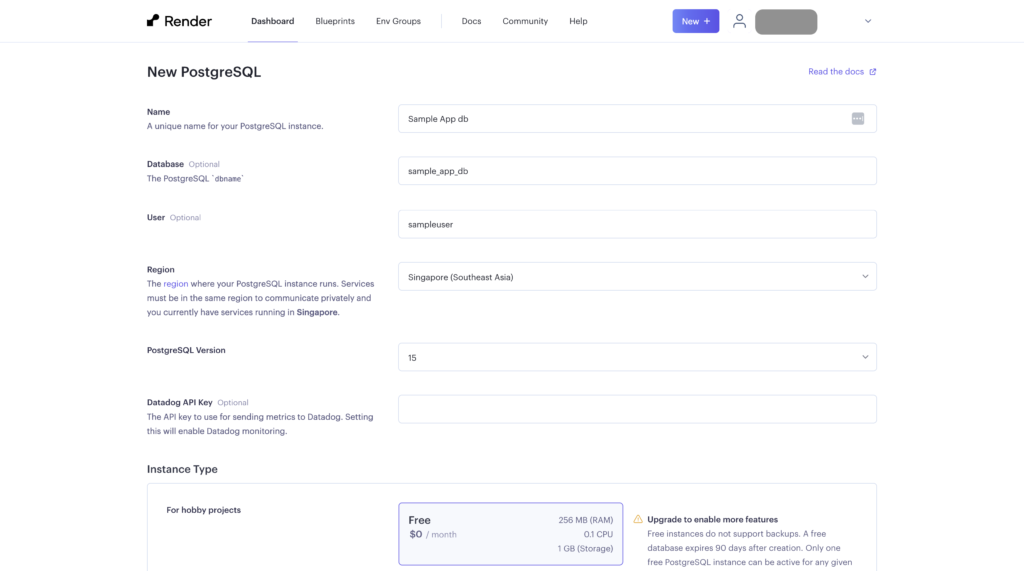
次のように入力し、画面左下の「Create Database」を押しましょう。
- Name: なんでもいい
- Database: なんでもいい
- User: なんでもいい
- Region: 一番近いSingaporeが無難
- Instance Type:Freeを選択
以下のように作成したDBの情報が表示されればデータベースの作成は完了です。
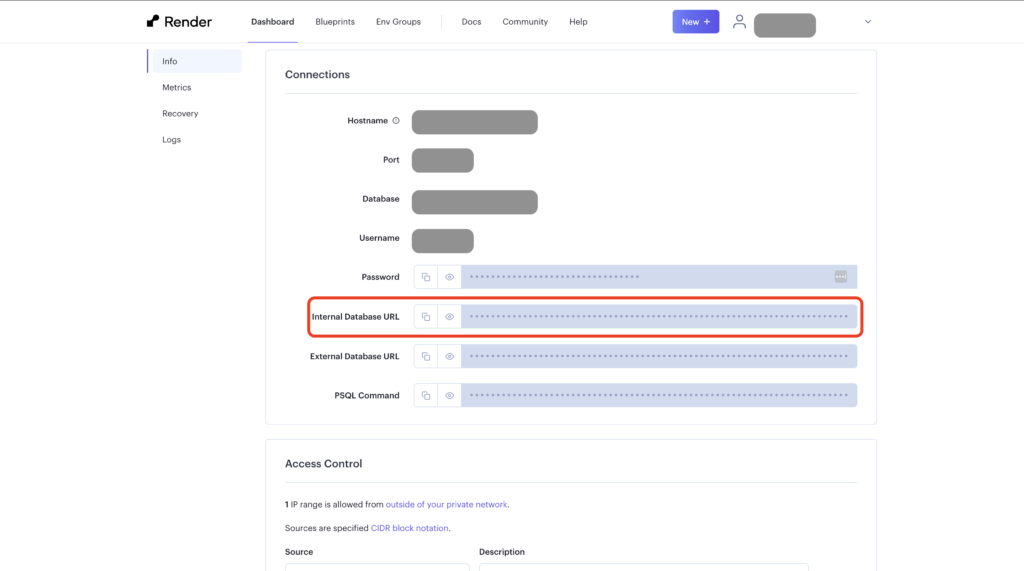
なおInternal Database URLは後ほど必要になります。
11. Web Servicesの作成
次にWeb Servicesを作成します。
右上の「New +」を押してWeb Servicesを選択してください。

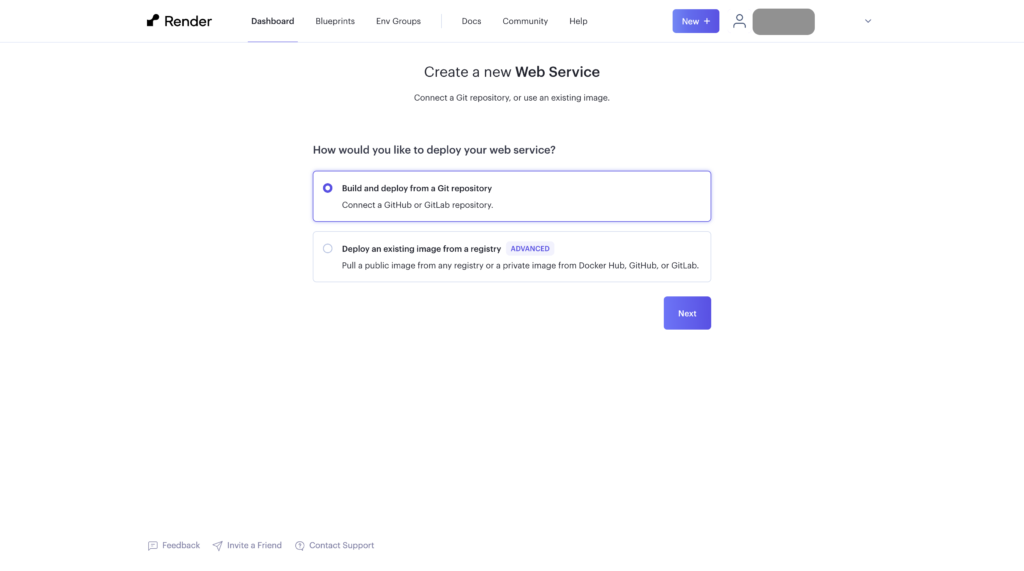
何をデプロイするか聞かれるので「Build and deploy from a Git repository」を選び「Next」を押してください。
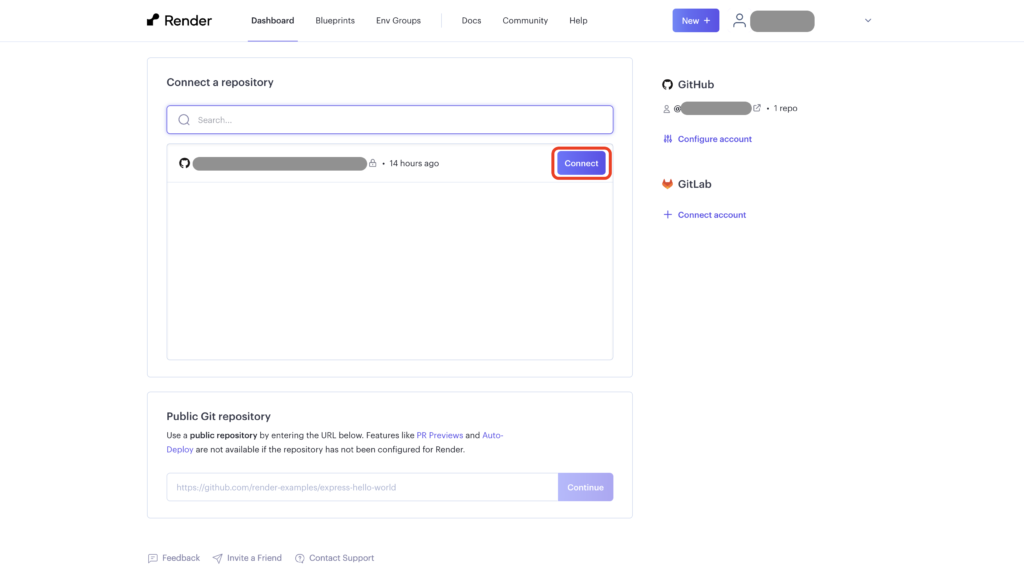
次の画面でGitHubとの認証を完了させるとリポジトリを選べるようになるため、RenderへデプロイしたいリポジトリをConnectしましょう。
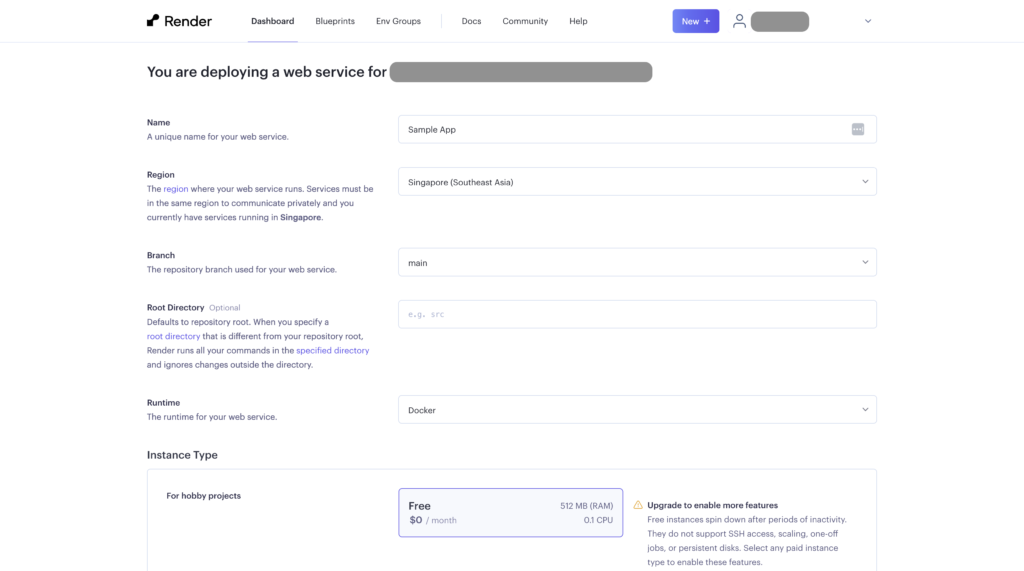
入力画面に進むのでそれぞれ次のように入力してください。
- Name:なんでもいい
- Region:データベースと合わせる
- Branch:デプロイしたいブランチ
- Runtime:Dockerを選択
- Instance Type:Freeを選択
画面を下にスクロールすると「Environment Variables」という項目があるため次のように入力します。
- DATABASE_URL:9.1で作成したデータベースのInternal Database URLをコピペ
- SECRET_KEY_BASE:
config/master.keyの中身をコピペ
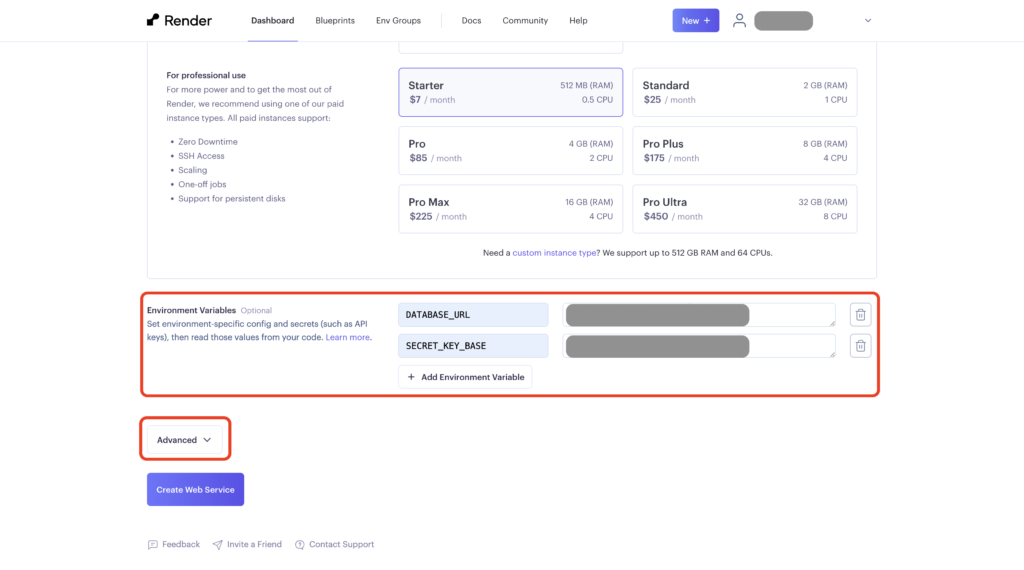
入力が完了したら「Advanced」タブを開き、「Health Check Path」に/upと入力しましょう。
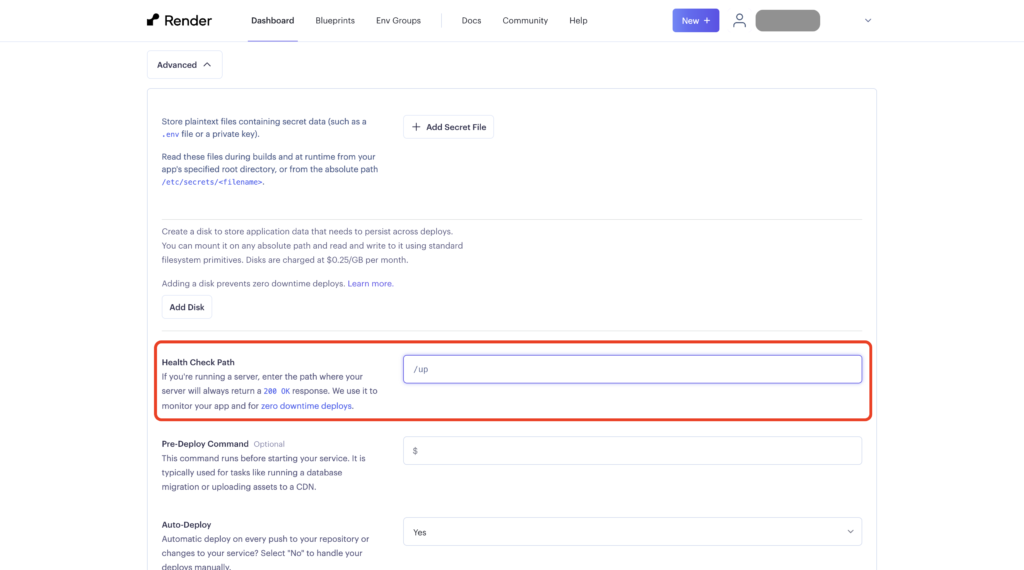
ヘルスチェックとはデプロイしたアプリがアクセスを正しく受け付けられるかを確認することです。いつでもステータス200を返すエンドポイントを事前に作成しておき、そのエンドポイントへRenderが定期的にアクセスしステータス200が返ってくることを確認しています。Rails APIモードの場合、デフォルトでconfig/routes.rbにヘルスチェック用のパスとして/upが用意されているので、この記事ではそれを使用しました。
最後に画面左下の「Create Web Service」を押せばOKです。
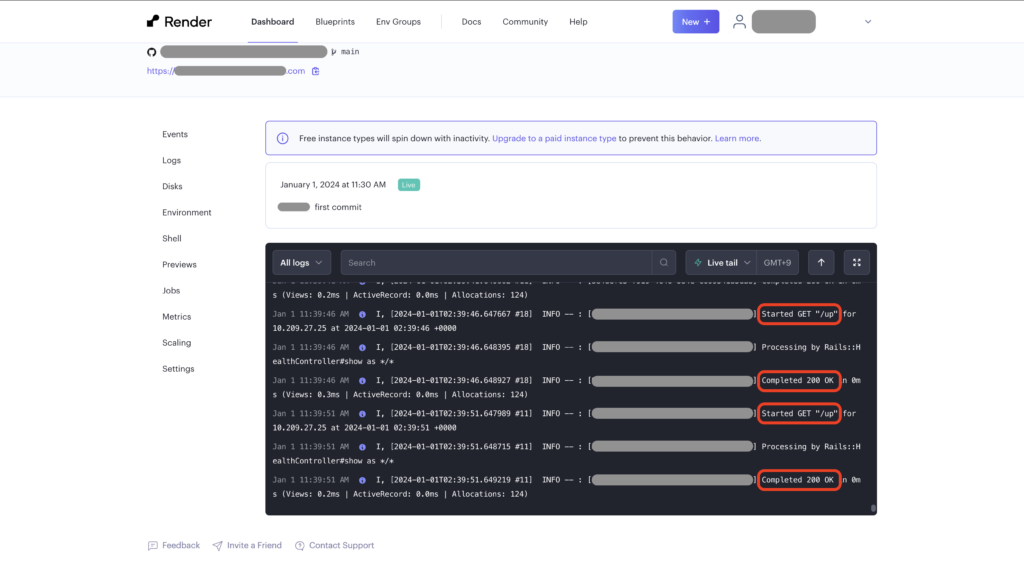
ログを表示する画面に遷移するので、Started GET "/up"とCompleted 200 OKがくりかえし出力していればデプロイに成功しています!(デプロイに時間がかかるので少し待ってから確認してください)
12. リリース完了!
これでリリースも完了です!
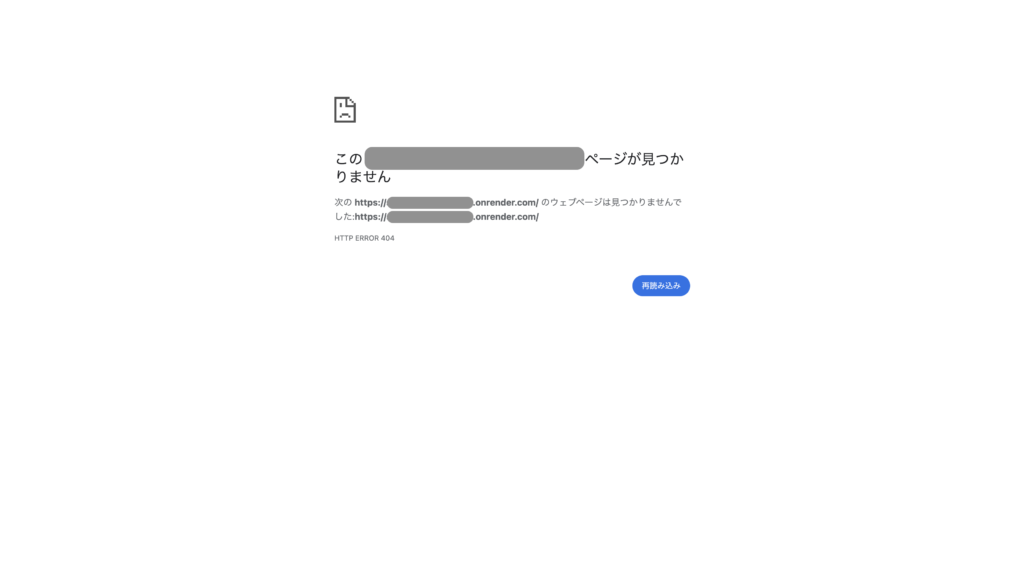
ただし今回はAPIモードでデプロイしているため、画面左のhttps://〇〇〇〇.onrender.comにアクセスしても404ページが表示されるだけです↓
心配な方はhttps://〇〇〇〇.onrender.com/upにアクセスしてみて、下記の画面いっぱいの緑ページが表示されることを確認しましょう。

まとめ
Rails7.1 APIモード + PostgreSQL + Docker + Renderの環境構築からデプロイの理解を深めることができました。
Rails7.1からはDockerfileがproduction用に書き換わる点が混乱を招くため、注意しましょう。


コメント